
Getting Started
Welcome to AI-enhanced coding with Codebuddy! This guide walks you through installing the VS Code extension, logging in, and — most importantly — understanding how to get great results out of Codebuddy day to day. Codebuddy has grown a lot, so whether you're brand new or coming back after a while, this post covers everything from your first prompt to the power-user features you'll reach for every day.
If you haven't installed it yet, open the Extensions view in VS Code, search for Codebuddy, and install it — or grab it from the Visual Studio Marketplace.
Logging in
Once installed, click the Codebuddy icon in the Activity Bar to open the Codebuddy panel. Before you can start, you'll need to log in to your Codebuddy account — just click the login button on the panel. If you already have a GitHub account it's a quick, two-click process; if not, create one and continue.
The onboarding wizard
The first time you log in, Codebuddy runs a short onboarding wizard that gets your project set up the right way. It asks whether you'd like voice replies, whether to enable codebase scanning (more on that below), and whether this is an existing project or a brand-new one. For existing projects, Codebuddy will build a quick summary of your codebase so it understands your stack from the very first message. You can re-run onboarding any time from the panel's menu.
A quick tour of the panel
Here's the main Codebuddy panel. It's worth a few seconds to get oriented, because nearly everything you'll do lives here.
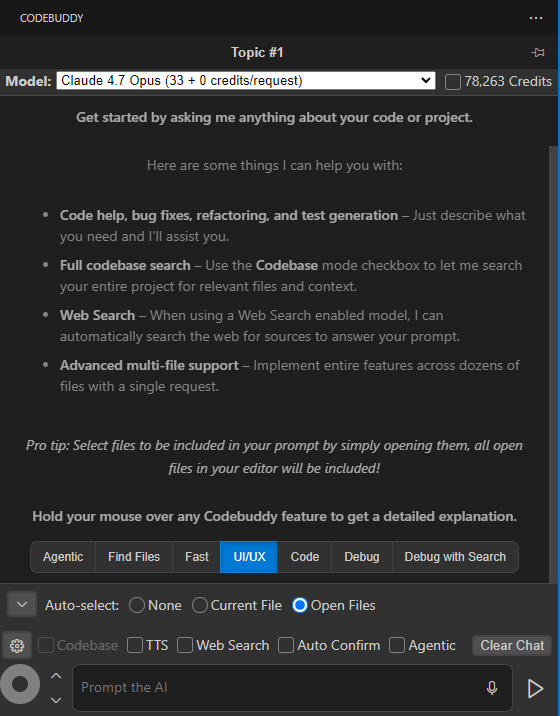
From top to bottom you'll find your conversation topic and model selector, your credit balance, the running conversation, the file auto-select control, a row of conversation-mode buttons, the options row (Codebase, TTS, Web Search, and more), the voice button, and the prompt box where you type. We'll cover each of these below.
Tip: hover over almost any control in the panel to get a short explanation of what it does — a fast way to learn the UI without leaving your editor.
How Codebuddy works: you're in control of context
The single most important thing to understand about Codebuddy is that you decide what context each message includes. Every message you send to the AI has to fit inside a single request to the underlying model (like Claude Opus or GPT-5), so being deliberate about context is what separates so-so results from great ones. You control which files are included, whether the file tree is attached, and how much conversation history comes along.
Including files as context
By default, any files open in your editor are included as context. The Auto-select control at the top of the options lets you choose what gets attached automatically — None, just the Current File, or all Open Files. This is the workflow we recommend: open the files relevant to your task, and Codebuddy sees them automatically. You can always fine-tune the exact set before sending.
Codebase understanding
The Codebase checkbox turns on Codebuddy's automatic file selection. It builds a vector index of your entire repository and then picks the files most relevant to your prompt for you. It shines when you're working in an unfamiliar codebase, or when you want to ask a question like "how does authentication work in this project?" — Codebuddy will find the auth-related files and answer based on them.
A couple of honest caveats: automatic selection adds some delay while it searches, and — like all AI — it's better at finding the needle in the haystack than at producing exhaustive lists. Don't rely on it to "select every file related to X". When you already know which files matter, opening them yourself is faster and more precise. Large repositories also take time to index; if the Codebase box is checked, your prompt waits until indexing finishes, so uncheck it if you want to work while indexing is still running.
The advanced options
Click the gear icon on the options row to reveal advanced toggles — the file tree, chat-only replies, extra reasoning ("Think More"), skipping the plan step, auto-retry on problems, and more.
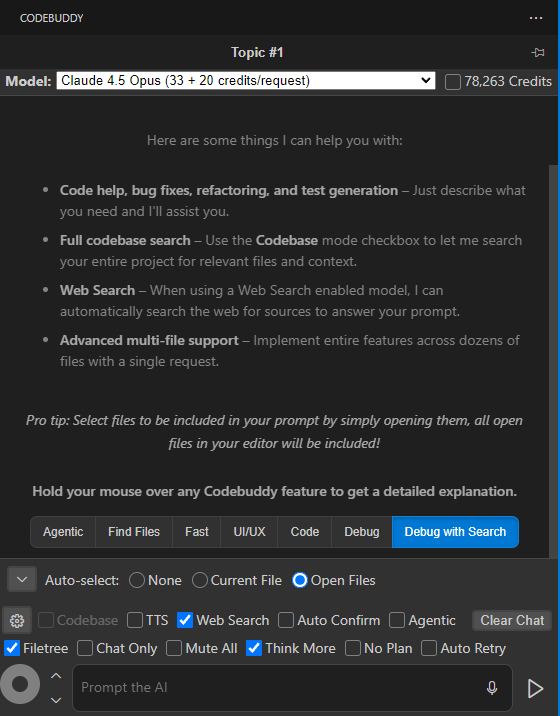
The Filetree option attaches your project's directory structure to the prompt. It's especially useful when creating new files, so Codebuddy knows where they should go. On large projects you may not want it on all the time — it uses context space — so treat it as a case-by-case tool.
The context space dial
Codebuddy keeps track of your context budget — how much room is left for your prompt after everything you're including (files, file tree, and conversation history) is accounted for. If you're getting close to the limit, free up space by closing files, removing messages from the conversation, starting a new conversation, or turning off the file tree. Just remember to leave room for Codebuddy's reply, not only your prompt!
Keep conversations focused
Codebuddy organizes your work so you rarely need to drag a long chat history into every message. When Codebuddy responds with code changes, it treats that exchange as complete. If you want to continue a train of thought, use the Reply button on a message to keep the next message in the same conversation.
Use this sparingly, though. It's usually better to let your code be the reference the AI works from, rather than a long back-and-forth. Piling up history can confuse the model by mixing several rounds of changes with the original files, and it tends to lock the AI into one line of thinking when a fresh perspective would serve you better.
Conversation modes
Conversation modes are one-click presets that configure Codebuddy for a specific kind of task — they set the right options and pick a well-suited model for you. You'll find them in a row just above the prompt box. In the screenshot below, Debug with Search is active, which automatically enabled the Web Search option.
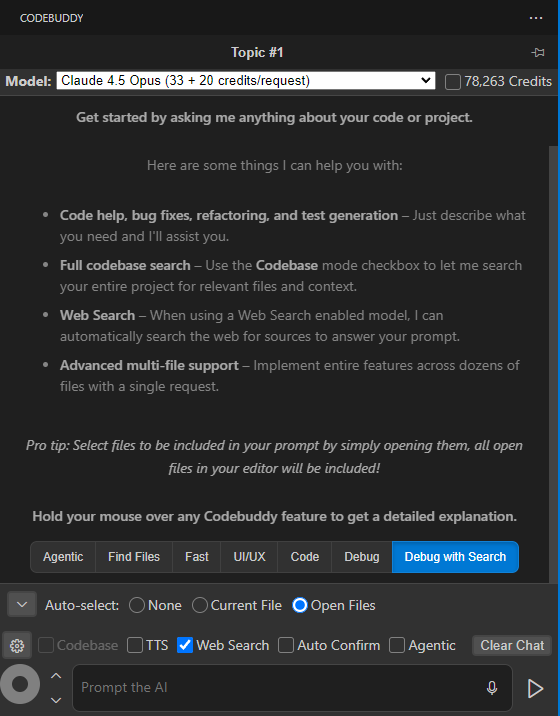
- Find Files — turns on automatic file selection and answers in a chat-only style, ideal for exploring an unfamiliar codebase or asking "where is X handled?"
- Fast — a lighter, quicker model for simple edits.
- UI/UX — tuned for front-end and interface work.
- Code — the everyday mode for implementing features and writing new code.
- Debug — adds extra reasoning ("think more") for tracking down tricky bugs.
- Debug with Search — like Debug, but also lets the model search the web for docs, error messages, and library specifics.
- Agentic (when enabled on your account) — lets Codebuddy work more autonomously across multiple steps.
Switching modes instantly updates the options and the selected model, so you can go from exploring to implementing to debugging without fiddling with individual settings.
Choosing your model
Codebuddy supports a wide range of models from OpenAI, Anthropic, Google, and others, and new ones are added as they're released. Use the model selector near the top of the panel to pick one — each shows its per-request credit cost so there are no surprises. Higher-capability models cost more credits per request; lighter models are cheaper and faster for simple work. If your team has standardized on particular models, you can set a default model per conversation mode in the project settings, so everyone gets a consistent setup.
Conversation topics
Topics let you keep several independent lines of work going at once — a bug fix here, a feature there — each with its own history and file context. Click the topic selector at the top of the panel to switch between them, rename them, or create a new one.
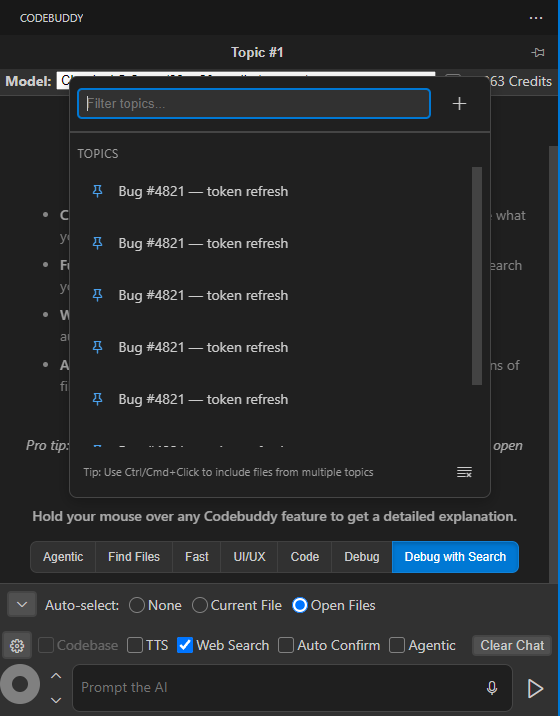
Two features make topics especially handy:
- Pinned topics are saved to your project's shared settings file and persist across sessions (and across teammates), so an important line of work is always a click away.
- Multi-topic include lets you pull the files from another topic into your current prompt — just Ctrl/Cmd-click a topic to include its files alongside your own. It's a quick way to combine the context of two related tasks without manually re-opening files.
Making multi-file changes
This is where Codebuddy really earns its keep. It can make sweeping, multi-file changes across an existing project — select the components, services, controllers, and views involved in a feature, describe what you want, and Codebuddy applies the changes to every file directly, including creating new files where needed.
For brand-new projects, there's nothing for Codebuddy to reference yet, so start by discussing the directory structure before you generate files. For certain stacks — a React app, say — it's often best to scaffold with a tool like Create React App or Vite first, then let Codebuddy build features on top. For smaller projects (a Python script, a handful of JavaScript modules), starting from scratch with Codebuddy works well — just agree on the layout first.
More ways to add context
Attaching images
You can attach images to your prompt — a screenshot of a bug, a design mockup, an error dialog, or a diagram. This is perfect for "make it look like this" UI work or for showing Codebuddy exactly what a rendering bug looks like instead of describing it in words.
Queuing prompts
If you think of your next instruction while Codebuddy is still working on the current one, you don't have to wait. Add it to the prompt queue and Codebuddy will run through your queued messages in order — a great way to line up a sequence of steps and let it work while you review earlier results.
Voice input
Prefer to talk through a problem? Codebuddy's voice input lets you describe what you want out loud, which is often faster and more natural than typing — especially for explaining a bug you'd otherwise talk through with a colleague. Trigger it with the microphone button in the prompt box.
Web page inclusions
You can pull the contents of any web page directly into your conversation. Paste a URL — a blog post, API documentation, a tutorial — and Codebuddy converts it to text and includes it in your prompt, so you can ask it to implement what the page describes or discuss its content in depth. To capture pages as you browse, grab the Codebuddy Chrome extension.
Project settings
Codebuddy stores per-project configuration in a committed settings.codebuddy file, which means your whole team shares the same setup. It includes:
- Billing organization — charge this project's usage to a team organization instead of your personal credits.
- Project archetype — hints at the kind of project you're building so Codebuddy can prepare the right context.
- Always-include files — workspace-relative files that are added to the context on every single message (handy for a coding-standards doc or a key config file).
- Default models — the model each conversation mode should use, so your whole team gets a consistent experience.
Because the file is committed alongside your code, everyone who opens the project inherits the same configuration automatically.
Editor integration
Beyond the main panel, Codebuddy adds a few actions right where you're already working. Select some code in the editor and right-click to reach them.
Explain This
Highlight a section of code, right-click, and ask Codebuddy about it. Your selection is sent along with your question, so it's a precise way to ask about one piece of code without describing where it lives — and handy for reasoning about files that are too large to include whole.
Fix with Codebuddy
When VS Code flags a problem, Fix with Codebuddy sends the error and its surrounding code straight to Codebuddy and asks for a fix — no copy-pasting stack traces required.
Run in terminal
When Codebuddy suggests a shell command in a code block, you'll see a Run button on it. Click it to run the command directly in VS Code's integrated terminal — no need to select, copy, and paste.
Tips for great results
- Open the files that matter, and only those. Precise context beats a huge pile of files every time.
- Watch your context budget. Leave room for the reply, and trim files or history when it fills up.
- Keep conversations short. Let the code be the source of truth; start a new conversation for a new task.
- Use the right mode. Find Files to explore, Code to build, Debug to fix.
- Discuss structure first on new projects, so Codebuddy knows where new files belong.
That's everything you need to start coding with Codebuddy in VS Code. Open a project, pick a couple of relevant files, choose a mode, and ask for something — you'll be surprised how much you can get done. Happy coding!